
Introduction
Growing potatoes in containers lets beginners control the potting medium, drainage, container volume, and planting depth instead of adapting to an unknown in-ground plot. That control helps maintain a suitable root zone from planting through harvest, while moisture checks and at least six to eight hours of direct sunlight remain essential, as advised by University of New Hampshire Extension.
This flexibility works well in a small urban garden, on a balcony, or in a paved yard. Choose a container that drains freely and fill it with a loose, well-drained growing medium. Because recommendations for container size vary widely, match the volume to the number of seed potatoes rather than relying on one universal pot size.
Why Growing Potatoes in Containers Gives You a Cleaner Start With Soil
A container lets you choose the growing medium from the outset instead of adapting to the conditions in an existing garden bed. Potatoes do best in a light potting mix that retains usable moisture but stays loose enough for tubers to expand. The University of Illinois Extension method recommends light potting soil or potting mix and emphasizes the need for adequate drainage. Related: Growing Tomatoes in Containers Gives Beginners a Head Start in Small Spaces.
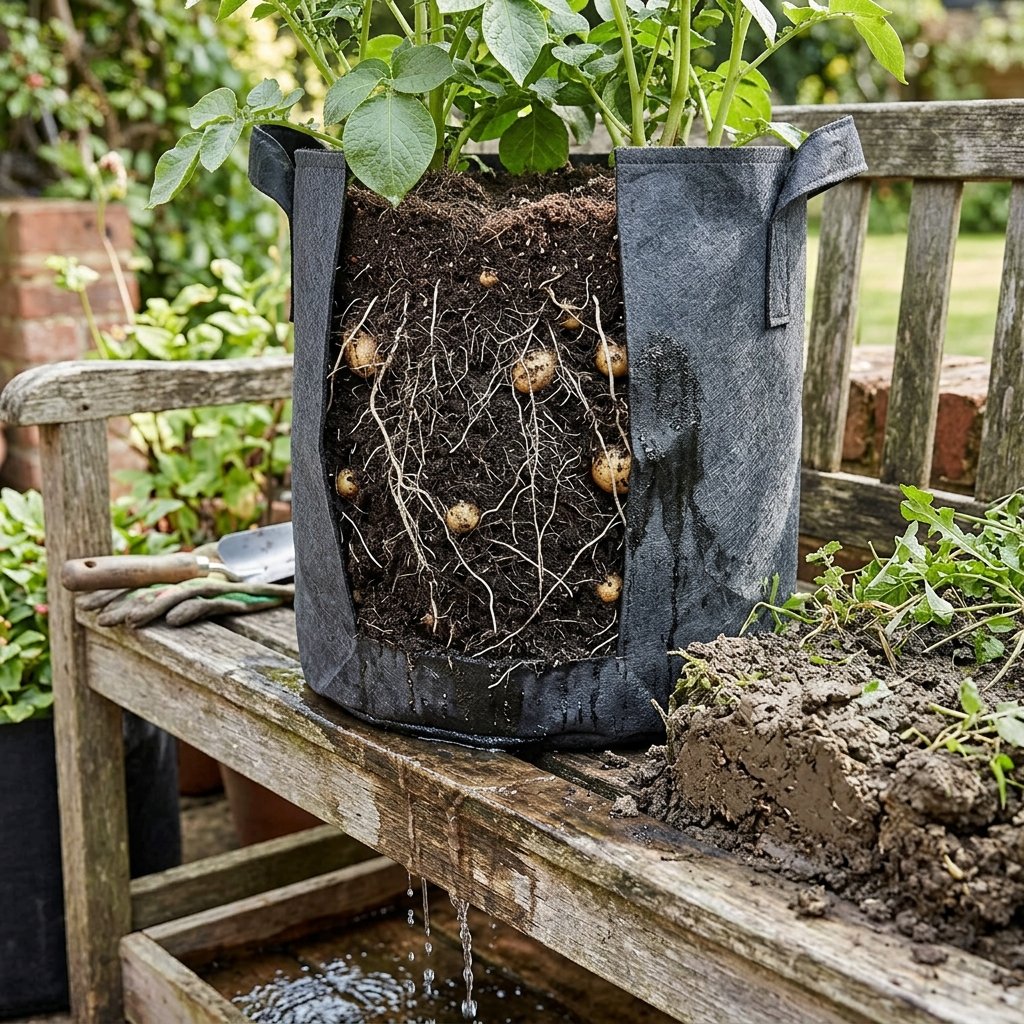
Think of the container as a defined root zone. You can inspect the mix, make sure the drainage holes are open, and estimate the soil volume available to each plant. A garden bed may perform just as well, but its texture and drainage are conditions you must work around rather than control from the start. Good soil alone does not guarantee a crop; the goal is a medium with sufficient air space, balanced moisture, and room for tubers to develop.
- Growing medium: choose a light potting mix instead of relying on an unknown existing soil structure.
- Drainage: confirm that excess water can escape through open drainage holes before planting.
- Soil volume: determine how much medium each plant will receive so the root zone does not become overcrowded.
Build the Potato Root Zone Before You Plant
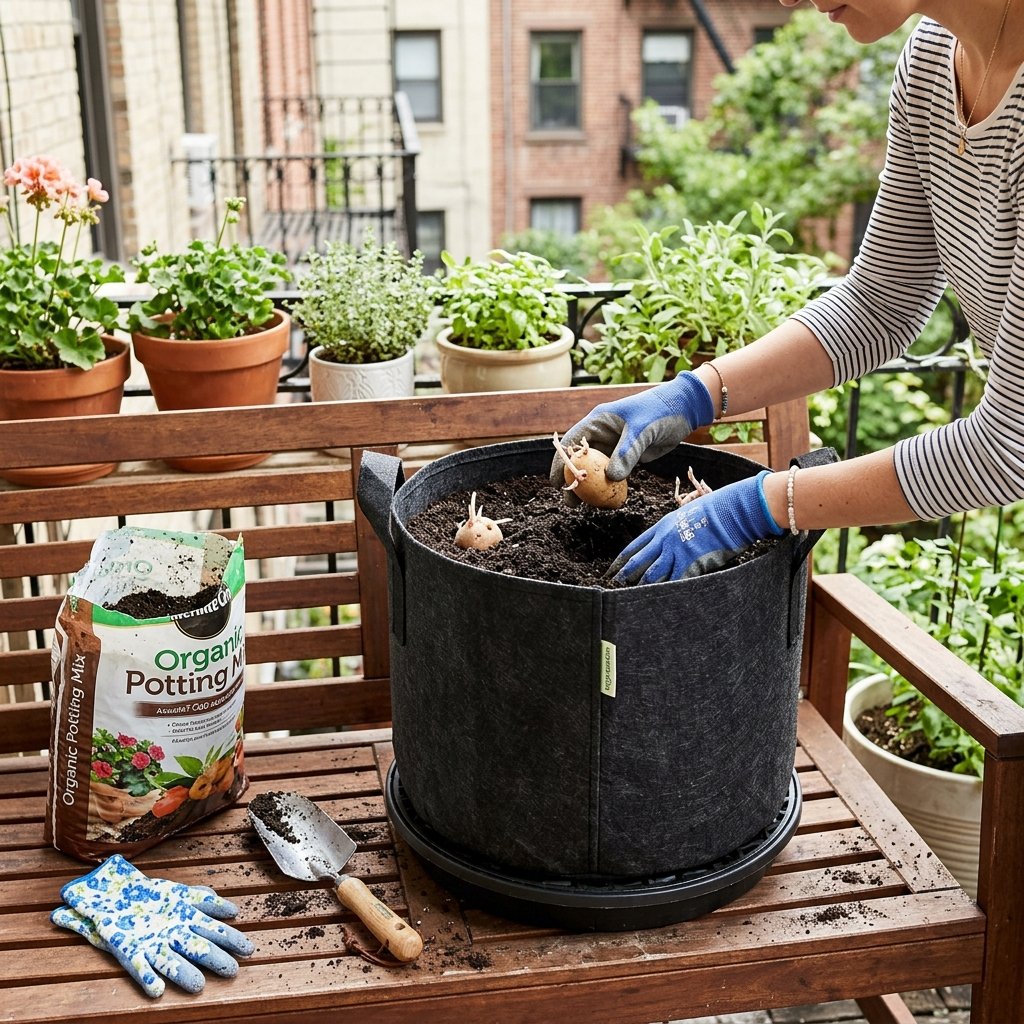
Set up the lower root zone in a deliberate sequence: check the drainage, add a few inches of light potting soil, place the seed potatoes with their sprouts facing up, cover them with 4–6 inches of soil, and water thoroughly. This gives the tubers a consistent planting depth while leaving room to add more medium later.
Use a Light Mix and Confirm Drainage First
Good drainage is essential to the Illinois Extension container method. Before adding potting soil, inspect the container’s base and make sure excess water can escape freely. Blocked openings can leave the root zone saturated.
Choose a light, well-draining potting mix instead of ordinary garden soil. The mix creates a loose lower layer where roots and developing tubers can access both air and moisture.
Start Low Enough to Leave Room for Later Soil
- Add a few inches of potting soil to the container.
- Place the seed potatoes on the surface, spaced apart, with sprouts facing up.
- Cover them with 4–6 inches of soil, following the Illinois Extension sequence.
- Water the newly planted layer well, allowing excess water to drain away.
The lower layer establishes the planting depth, rather than leaving the tubers wherever they happen to settle. If you plan to add medium around the growing stems, do not fill a tall container to the rim at planting. Leave enough headroom for later additions, while remembering that gradual covering is an option, not a guaranteed way to increase yield.
Match Container Volume to the Number of Plants
Count your seed potatoes before choosing a container. Published recommendations vary, but the underlying principle remains consistent: each plant needs enough soil for its roots and developing tubers, while overcrowding can reduce yield.
| Container guidance | Planting capacity | Beginner takeaway |
|---|---|---|
| At least 14 inches deep and 10–15 gallons, according to The Old Farmer’s Almanac guidance reported by AOL | Roughly five gallons of soil per plant | Calculate the volume first, then limit the number of seed potatoes |
| A minimum 25-gallon grow bag, according to Bootstrap Farmer | Use the larger space to reduce competition among tubers | A practical choice if you want more room in one bag |
| Smaller containers are mentioned by other gardening sources | Capacity varies with the source and intended crop | Do not treat one size as a universal rule |
These recommendations reflect different growing goals rather than conflicting instructions. A 10–15-gallon container may suit a small planting, while a 25-gallon grow bag gives the tubers more space to develop. Treat the “five gallons per plant” guideline as a planning rule, not a promise of a specific harvest.
Before buying a container, write down how many seed potatoes you plan to plant. Divide the container’s volume by that number and check that each plant will have adequate space. Choose a sturdy pot or grow bag with several drainage openings. Adding more plants to one container creates more competition, not a guaranteed larger harvest.
For more on the advantages of choosing and managing containers, see What is Container Gardening? 5 Proven Benefits.
Add Soil as Plants Grow—Without Promising Bigger Yields
Adding soil around potato stems, known as earthing up or hilling, can protect developing tubers and create more covered growing space. It is not a guaranteed way to increase the harvest. Keep enough growing medium available to cover exposed areas, but treat each added layer as protection—not a magic yield multiplier.
What Earthing Up Can and Cannot Do
As stems lengthen, draw soil around them to form a soil ridge. The ridge keeps developing tubers away from light, which can turn potatoes green, and may increase the covered stem area where tubers can form. The University of Maryland Extension guidance says that covering more stem area can allow more tubers to grow.
There is no sound basis for promising that every added layer will produce a larger crop. The Royal Horticultural Society says earthing up is not thought to increase yields significantly and notes that gardeners who cannot earth up should still get a good crop. Thompson & Morgan trials likewise found gradual filling unnecessary when soil and foliage kept the potatoes out of direct sunlight.
- Watch the stems. If developing areas or tubers become exposed, cover them with loose soil or compost.
- Build gradually if convenient. Leave foliage growing above the surface rather than burying the whole plant.
- Stop treating hilling as a yield target. If the stems remain covered and the plant has room to complete its life cycle, skipping further additions does not automatically mean failure.
Keep Your Chosen Soil Conditions on Track All Season
Soil management continues after planting. Keep the root zone consistently moist, not soaked. Test it with the finger test: push a finger about two inches into the mix. Water when the soil feels dry at that depth; if it is still damp, wait another day.
- Check moisture weekly. During active growth, roughly 1–2 inches of water per week provides a starting point, not a fixed schedule. Hot, windy weather and fabric bags can dry the mix faster, so inspect the soil before watering.
- Water thoroughly. Apply water slowly until a little drains from the bottom. Empty the saucer afterward so the container does not sit in runoff.
- Check the position. Potatoes need at least 6–8 hours of direct sunlight each day. Because sunlight affects how quickly the container dries, check the soil again after moving it.
On a small balcony, wind and reflected heat can turn a manageable watering routine into a daily task. The site’s guide to Gardening on a Small Balcony: Solutions for Wind, covers placement, heat, pests, and runoff—factors that help maintain steady moisture in a limited space.
Brief, regular checks help prevent large moisture swings. Adjust watering according to the soil, weather, and container location instead of following a rigid weekly schedule.
Conclusion
These checks make growing potatoes in containers more manageable, especially when space is limited. Use a loose, well-draining potting mix, choose a container size that suits the number of seed potatoes, and plant them at the recommended depth. Check the moisture regularly throughout the season.
Before planting, choose a container with open drainage, buy certified seed potatoes, and confirm that you have enough suitable soil and growing space. Consistent conditions give the plants the best start.